I have been my own best customer up until a while ago, and, because I haven't been lately I was deactivated as an AMuse Studio Consultant. This will only be a temporary dip in the works. I will be back as soonas I can. In the meantime, if you would like to order from A Muse Studio, you may do so through Mary Key or Chelsea Comer. Either of these ladies will be a great help to all. When I become a consultant again, I will let you know and you can resume ordering from me. In the meantime, I will be purchasing some supplies in the near future and will do a workshop with a few of the items that I have posted on my Facebook page. I will be posting pictures of my creations on this blog along with those of other A Muse consultants. I will post who gets credit for the items, if they are not mine, and if I know who posted them. Please let me know if there is something you want to order and I can also give your order to either of the 2 ladies. In the meantime, hope to see you at one of my classes or workshops or Open Houses, very soon. Feel free to invite your friends and have them invite their friends. I am open to all.
Monday, July 20, 2015
Monday, June 29, 2015
If Saturdays don't work for you, let me know. I am open to other days for my Open Houses. I will be starting some Monthly Clubs also. A Monthly Club is different than an Open House in a couple different ways. 1) I limit them to no less than 6 people per club and those people come on the same night each month and the same week of the month, 1st, 2nd, etc. whichever works out for them. Each person in the group orders $30 minimum each month and the workshop fee is waived. This club is a committment. If you can't come in a certain month, you still order $30 in product. This club is one where each month a different person in the club is the HOSTESS and receives the benefits as if you were having the workshop or class in your home. You don't have to do anything to prepare, like cleaning your house or getting anything ready. All I ask is that when it is your night, you supply a treat for the group.
2)A club where you come each month and you do 3 cards and 1 6 x 6 scrapbook layout. You order $30 in products and the workshop fee is waived. This club is the same as the club in #1.
3) A casual club is where you come when you can. It is just like my Open House where you come and make 3 cards and another project and you pay $10 or order $30 in product and if you can't make it that next month, you are NOT obligated to pay for a missed night. This is one for those people who have never stamped before or aren't real sure that they can make it because of obligations with work or family activities.
Each club is at my house and is scheduled for a 2 hour time period from 6:30-8:30, HOWEVER, if it takes longer for you to finish a project or a card, I WILL NOT chase you out. You can stay till you finish. I know really well how it goes when you are having fun and spend more time chatting than getting anything accomplished. ( Don't ask me how I learned that! It's my secret and I'm stickin' to it!) Ha! Ha! Questions? Contact me. 815-289-0293 also.
If you are interested in any of these groups, let me know either through my personal Facebook page, my www.facebook.com/busybeastampin page, or my www.busybeastampin.blogspot.com page or just personal message me. Leave me your name and phone number and the number of the club you are interested in and a day of the week that is best for you. I can also do weekends and possibly 1 daytime group.
Hope to see lots of names and faces.
Friday, June 26, 2015

SUPPLIES USED:
Brown Paper Bags BAGPAP1
1/2" x 3" strip of Onyx Petite Polka Dot Cardstock
Buttercup cardstock
Onyx cardstock
Vanilla cardstock
Just Beecause stamp & small bee stamp from Bee Happy Stamp Set
Mason Jar Stamp from the Mason Jar Stamp Set
Bee Happy Die Set to cut Bee for the clothespin
Small Clothespins
1. Cut 1/2" x 3" strip of Onyx Petite Polka Dot Cardstock
2. Using the 2 1/2" and 2 1/8" circle dies, cut 1 vanilla circle and 1 onyx circle. Stamp the Mason Jar on the Vanilla cardstock and the small bees from the Be Happy Stamp set from scrap pieces and cut them out with the New Bee Happy Die Set.
3. Use a Scallop Nestabilities Circle or a Scallop Punch and punch 1 or cut with die cutting machine.
4. Stamp and color a larger bee and cut out with the Bee die and using a glue dot, attach to the small clothespin.
5. Attach the Vanilla circle to the Onyx circle and to the Buttercup Scallop Circle.
6. Attach the Onyx piece to the bag and then attach the Scallop Circle to the bag.
7. Below the Onyx Polka Dot Petite Cardstock, stamp Just Beecause.
8, Attach the clothespin with the bee to the top of the bag.
9. Fill bag with items of your choice.

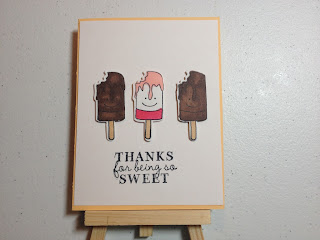
Supplies Used:
All supplies are from A Muse Studio
1/2 sheet of Melon cardstock or color of choice.
5" x 4 1/4 piece of Vanilla cardstock
Ice cream bars from We All Scream Stamp Set
Ice cream bar die from the matching die set.
Thanks for Being So Sweet Stamp, also from We All Scream
Copic Markers, your choice of colors.
Onyx Ink
3D foam adhesive
1. Fold Cardstock of choice in half.
2. On Vanilla cardstock, stamp Thanks For being so SWEET.
3. Stamp a piece of vanilla cardstock, (can use scraps), with the ice cream bar stamp 3 times.
4. Place the ice cream bar die over the ice cream bar that you stamped, tape down to hold in place and run it through. 3 times so you have 3 different bars. You can either color them with Copics or markers first before cutting or after you cut them.
5. Use 3D foam adhesive on each bar and place them where you would like on the card.
6. I used another bar on the inside of the card.
7. If you choose to, you can stamp and color a bar on the envelope also.

SUPPLIES USED:
Berry Cardstock from the Winter Palette
Cherry Petite Polka Dot Cardstock
Papaya Petite Polka Dot Cardstock
Craft Sticks
Candy Wrapper Die from the A Muse Studio Catalog
1. Score and fold Berry cardstock.
2. Using the Cherry and the Papaya Petite Polka Dot Cardstock, run them through your die-cutting machine, and cut at the score line in the center section. You will only use 1 half of each color for each card.
3. Glue the 2 colors of cardstock to the craft sticks and using Sticky Strip, attach Craft Sticks to the card.

SUPPLIES USED:
White Cardstock
Wasabi Chevron Cardstock
Wasabi ink
Hello Stamp from the You and Me Stamp Set
Small Bow Die
1. Score 1 sheet of white cardstock 5 1/2 x 4 1/4" in half and fold.
2. Using the Small Bow Die, cut 5 bows and cut the ends off and don't toss them.
Using a stylus, go across each side of the bow so it folds easily.
Bend each side of the bow to the middle, but don't crease the center.
Do this for each bow, then criss cross each bow on top of each other and glue them down. On the final bow, You will cut it in half and use 1 piece for the center of the bow.
3 For the final piece, use a 3D foam piece to fit it inside the space and to elevate it a bit.
4. Attach the tails to each side of the bow.
5. Attach the bow to the card with a 3D foam piece or some Tombow glue.
6. Stamp the HELLO with the Wasabi ink.
Thursday, June 25, 2015

Monday, June 22, 2015
June Open House and New Catalog Launch
THE NEW CATALOG is out. Wanna see it? Come to my Open House on Saturday, June 27, 2015 anytime between 11 and 5. RSVP by Wednesday, June 24 so I can have enough ready for everyone. I do all the cutting and you do the coloring, and the assembly and all the fun parts! I'll be showing you how to use the Big Shot or Grand Calibur, (whichever one isn't being used by someone else) and how to make a bow. If you are like me and can't make a bow to save your life, you will LOVE these.
The cute bag is one that we made at Chelsea Comer's workshop from the Bee Happy Set. How can you not Bee Happy when your name is Bea!


The cute bag is one that we made at Chelsea Comer's workshop from the Bee Happy Set. How can you not Bee Happy when your name is Bea!


Tuesday, January 20, 2015

Saturday, January 17, 2015
Well you learn something new everyday! I just learned that with the Grand Calibur the pressure is all on the right side and on the left side, so you should place your dies up and down the plate rather than across because you will get a better cut! Learned this watching the Create and Craft Channel. And the die cut machines don't actually cut, (which I knew), they provide the PRESSURE to the die that creates the cut.
See even someone who's been doing this for a long time can learn something new!
See even someone who's been doing this for a long time can learn something new!
Wednesday, January 14, 2015
Love is in the Air says Chelsea
These pictures are the really cool projects that we did at Chelsea Comer's Love is in the Air workshop last Sunday. She is so creative All of these were made with the January collection, which is the very FIRST monthly collection. They are all available till January 31st and may or MAY NOT appear in a future catalog. Take a look at them on my website www.amusestudio.com/bea. Click on the picture of the pillow box and you can see the whole collection. You can buy whatever you want or you can buy it all. It's your choice and it IS NOT a subscription. These collections will be monthly EXCEPT in the month of June which is when the new annual catalog is released and in August when the Holiday catalog is released. I have to say my favorite set is MY PUNNY VALENTINE. It is a really versatile set that you can use for many things.


Subscribe to:
Posts (Atom)